In the meantime, I have the remainder of my Christmas recipes to share! Part 1 of this spirited series brought the first 5 of my "12 recipes of Christmas"and without further delay, I present to you the remaining 7:
6. Banana and Pomegranate Muffins

Seemingly for years, I've been fascinated/borderline obsessed with pomegranates. I generally enjoy their taste and for years I've been trying to build up the courage to break into one on my own. My hesitation to take the plunge stems largely from my fear of making a mess of red dye everywhere, as well as not knowing what I was was doing/getting myself into. Would it be a lot of work? Would I hate it? Would I ruin anything and everything that the pomegranate comes into contact with? So many questions.
Finally, I just said to hell with it and took the plunge. I figured that since they hand out instructions with the display at the store that I wasn't the only one who was confused/scared, and if others could successfully cut open and dine on one of winter's signature fruits, so could I. It wasn't nearly as messy as I'd feared (although don't get me wrong, I definitely had a few rogue seeds leave a trail of red on my counter and kitchen floor, although it came up easily) and actually kind of fun. I used the seeds to create some delicious muffins, which I included in a gift basket of holiday cheer that I made for the doormen at my apartment building, which they loved. Hopefully that'll buy me another year of forgiveness for Baxter's occasional harsh feelings towards them.
Ingredients
Recipe adapted from Jen's Favorite Cookies
- 1 cup pomegranate arils
- 1/2 cup sugar
- 1/4 cup water
- 1/2 cup butter, softened
- 2-3 very ripe bananas
- 1/2 cup brown sugar
- 2 eggs
- 1/2 tsp salt
- 1 tsp. baking soda
- 2 tsp baking powder
- 3/4 cup quick oats, plus 1/2 cup or so for topping
- 1 1/2 cups flour
- 1/2 cup pomegranate syrup (see above)
Preparation

2. For muffins: Cream butter and sugar. Add bananas and eggs, and mix well
3. Add soda, baking powder, and oats and mix well. Add flour and mix until combined. Add ½ cup of the pomegranate syrup, and mix well

4. Divide batter evenly between 12 muffin cups and top with remaining oats

5. Bake at 375 for 18-22 minutes, until lightly brown on top
*These were quite possibly the most perfect muffins I have ever made, not a single one was brown on the bottom (and I have a disappointing track record with muffins)

Plated and ready to be wrapped

Inside the box of tricks. I fell in love with these treat boxes this year.

Wrapped and ready to be delivered from Gian and Bax. Yes, I'm that person.
7. Secret Santa Gifts

This year my team at work decided to do Secret Santa. I was thrilled from the get-go, and even more so when the rule that we had to make the gift was announced. Since that's what I was going to be doing anyway, I was excited to see what others came up with. We drew names and I got the only vegan on the team. While some may have been disheartened, this made my day. I already knew I was going to be giving my trademark treat bags to the rest of the team and had been struggling for sometime with what to get her. Enter my plethora of mason jars and some time on the interweb and what do you get:
Vegetarian Black Bean Chili in a Jar
Recipe courtesy of Recipe Goldmine
Ingredients


This recipe and I have had a very up and down relationship. It was introduced to me by a coworker a year or so ago at a work gathering and I fell in love with it. I tried to recreate it for a party last year and it tasted nothing like the original. My friends liked it, but knowing what it was supposed to taste like, I was underwhelmed. And so, I parted ways with the recipe...at least for a time.
During our work holiday party this year, the same coworker made the original version yet again, reigniting my desire to recreate it on my own. And so back to the kitchen I went. I begged (well, more so just asked once as she was very willing to share and offer words of encouragement) for the recipe again (I'd thrown it away after my failings last year) and away I went. This time, I nailed it! They tasted just like the original version that I'd tried to create last time around. What I find most odd about this recipe is that, taken individually, I pretty much hate everything in the dish. But put them together and roll them up in a fun tortilla and I'm in love. These travel and store really well so they're a great make-ahead app to take to parties (which is exactly what I did).
Ingredients

Preparation
1. Mix everything together with really good with a spoon (no blender) so it’s all blended together and smooth
2. Spread it thinly on a wrap, and roll it up. Make sure you spread it in a thin layer. If you use too much cream cheese, it globs up as you’re rolling it up, makes it messy to cut, and it doesn't taste very good with too much filling.
3. Cut into small bite-size pieces. You can throw away the end pieces because they don’t stay rolled up (I may or may not have eaten these as a snack while cooking :))

9. Christmas Sugar Cookies

I'm not exactly sure how or when it started, but at some point in my teenage years, Sister and I began the tradition of making Christmas cookies on or near Christmas Eve. Despite my mother's aversion to cooking, I can't remember a Christmas without decorating Christmas cookies. The process has evolved a lot over the years, from rolls of pre-made Pilsbury dough and canned icing to making our own ingredients. My cookie cutter collection has also grown exponentially over the years. It's actually slightly out of control at this point, but I love making Christmas cookies so it's a good problem to have. It just doesn't seem like Christmas until these icing clad and colorful shapes make their debut. This year I tried out a new sugar cookie recipe and loved it. It was the first time the cookies didn't turn into giant masses of dough upon baking. I was very impressed and will be using this recipe for many years to come!


Preparation


10. Spinach and Cheese Swirls

Another Christmas tradition that has existed for as long as I can remember is our Christmas Eve "buffet." In hindsight, I believe the tradition spurred from my mother not wanting to cook a big meal or do a bunch of dishes the night before Christmas (when we'd be having a big meal and making them get up at the crack of dawn to begin opening presents), but the logic of no wanting to gorge ourselves holds true still. Plus, I love meals where I can have a variety of mini things and eat with my hands. We usually fill some large party trays with an assortment of wonderfulness, fill our plates, and watch my favorite Christmas movie, A Christmas Story. The spread used to include luncheon meats and cheese wraps that we'd used to make mini sandwiches, but since my dad is the only one that eats said meats at this point, the menu has evolved some over the years. The last couple of years we'd been all about these mini quiches, a la Costco, but then last year discovered that one of them contained mini bacon bits (talk about a nasty surprise). This year, to replace the mini quiches, I decided to make a recipe that had been taunting me from pinterest for some time. It didn't cut up exactly like the picture, but it was still good nonetheless and a great addition to our Christmas Eve festivities.

Preparation
11. Cranberry Breakfast Cake

Last year I began to tradition of taking a break from present opening to have a freshly baked breakfast treat. I always assume the role of Santa as I typically know what everyone else has gotten each other and like to puppet master the gift opening so the best presents are saved for last. Since Sister and I are older now, we tend to get our parents more presents which, when combined with ours, can make present opening extend for some time (I also don't let people open presents at the same time...I like order to the opening process). Since I like to drag out present opening for as long as possible (in an effort to prolong Christmas) the others tend to get a little cranky after not eating for hours on end (and you thought I was joking about this taking a while). To remedy this, I instituted a breakfast pause between stocking opening and gift opening.
I made a blueberry version of this cake last year and actually preferred it better. This time I used fresh cranberries and found it to be a little too tart, even with the addition of sugar. Live and learn. At least the peanut gallery wasn't ravenous and trying to rush the present opening process.
*Unfortunately, I got caught up in my Santa duties and forgot to properly photograph the dish, so since I wasn't that thrilled with it anyway, I'll just note that it came courtesy of Alexendra's Kitchen if you're interested in trying it out.


- 3 cups black beans, sorted
- 3 Tbsps dehydrated onion
- 3 Tbsps granulated garlic
- 1 tsp crushed oregano
- 2 tsps salt
- 1/4 to 1/2 tsp cayenne pepper (do not omit)
- 1 1/2 cups brown rice
Preparation
- Put black beans into the bottom of a jar
- Layer rice on top (or keep rice in a separate bag for a less pretty but more hassle-free version)
- Combine spices in a zip-type bag and place on bag on top of rice and beans
- Decorate (if desired) and attach this recipe for cooking:
Wash beans. Put in pot with contents of seasoning bag. Add 1 tablespoon olive oil and cover beans with 2 inches of water. Bring to a boil and simmer until very well done (about 2 hours). Beans should be very soft. Add water as needed to keep beans from sticking. There should be some liquid left on beans when done.
To cook rice, put 3 cups water and 1 teaspoon salt into a pot and when it boils, add rice. Lower heat, cover and steam for 20 minutes.
Serve about 1/2 cup rice in bowl, and ladle beans over the top. Sprinkle with minced cilantro, finely chopped green onion, and a squeeze of lime juice.
To cook rice, put 3 cups water and 1 teaspoon salt into a pot and when it boils, add rice. Lower heat, cover and steam for 20 minutes.
Serve about 1/2 cup rice in bowl, and ladle beans over the top. Sprinkle with minced cilantro, finely chopped green onion, and a squeeze of lime juice.
And, in a very appropriate twist of Secret Santa fate, quite possibly the only person that can rival me craft-wise drew my name. I was seriously impressed (and I'm a tough audience :))

Peppermint foot scrub

Brownie peppermint cookies (one of this year's pinterest items that I never got to) on a homemade peppermint plate?!
8. Cream Cheese Wrap-Ups

This recipe and I have had a very up and down relationship. It was introduced to me by a coworker a year or so ago at a work gathering and I fell in love with it. I tried to recreate it for a party last year and it tasted nothing like the original. My friends liked it, but knowing what it was supposed to taste like, I was underwhelmed. And so, I parted ways with the recipe...at least for a time.
During our work holiday party this year, the same coworker made the original version yet again, reigniting my desire to recreate it on my own. And so back to the kitchen I went. I begged (well, more so just asked once as she was very willing to share and offer words of encouragement) for the recipe again (I'd thrown it away after my failings last year) and away I went. This time, I nailed it! They tasted just like the original version that I'd tried to create last time around. What I find most odd about this recipe is that, taken individually, I pretty much hate everything in the dish. But put them together and roll them up in a fun tortilla and I'm in love. These travel and store really well so they're a great make-ahead app to take to parties (which is exactly what I did).
Ingredients
- 2 blocks of cream cheese (let sit out for a few hours to get soft)
- 1 small can (4 oz) chopped black olives
- 1 small can (4 0z) mild diced green chiles (make sure you get the mild green chiles, not jalepenos)
- Garlic salt to taste
- 1 package of flour tortilla wraps (Sundried Tomato Basil and Garden Spinach Herb were recommended, I love both, just don’t use low-carb or low-cal wraps because they’re too mushy, especially if you make it the night before)

Preparation
1. Mix everything together with really good with a spoon (no blender) so it’s all blended together and smooth
2. Spread it thinly on a wrap, and roll it up. Make sure you spread it in a thin layer. If you use too much cream cheese, it globs up as you’re rolling it up, makes it messy to cut, and it doesn't taste very good with too much filling.
3. Cut into small bite-size pieces. You can throw away the end pieces because they don’t stay rolled up (I may or may not have eaten these as a snack while cooking :))


I'm not exactly sure how or when it started, but at some point in my teenage years, Sister and I began the tradition of making Christmas cookies on or near Christmas Eve. Despite my mother's aversion to cooking, I can't remember a Christmas without decorating Christmas cookies. The process has evolved a lot over the years, from rolls of pre-made Pilsbury dough and canned icing to making our own ingredients. My cookie cutter collection has also grown exponentially over the years. It's actually slightly out of control at this point, but I love making Christmas cookies so it's a good problem to have. It just doesn't seem like Christmas until these icing clad and colorful shapes make their debut. This year I tried out a new sugar cookie recipe and loved it. It was the first time the cookies didn't turn into giant masses of dough upon baking. I was very impressed and will be using this recipe for many years to come!

To make the experience even more fun, I enjoy adorning my Santa apron....and we jazzed it up this year with fun hats, hot apple cider, and some Straight No Chaser Christmas jams
Ingredients
Best dough ever courtesy of Catch my Party
- 2 3/4 cups all-purpose flour
- 1 tsp baking powder
- 1/2 tsp salt
- 1 cup butter, softened
- 1 1/2 cups granulated sugar
- 2 eggs
- 1 1/2 tsp vanilla extract

Seriously, they held their shape perfectly!
Preparation
1. Combine flour, salt, and baking powder into a bowl, mix, and set aside
2. In another bowl, add the softened (room temperature) butter, eggs, sugar, and vanilla. Beat with an electric mixer until smooth
3. In three or four batches, add the dry ingredients to the wet, mixing until incorporated
4. Roll roll the dough out using a rolling pin and cut out shapes using a cookie cutter dipped in flour

5. Bake at 350 degrees for 8-10 minutes
6. After cooled, icing (using my favorite buttercream of course) and decorate as desired

Sister's favorite cookie cutter (courtesy of TF's mom's kitchen store) turned cookie.
She loves the Sooner state the most.
10. Spinach and Cheese Swirls

Another Christmas tradition that has existed for as long as I can remember is our Christmas Eve "buffet." In hindsight, I believe the tradition spurred from my mother not wanting to cook a big meal or do a bunch of dishes the night before Christmas (when we'd be having a big meal and making them get up at the crack of dawn to begin opening presents), but the logic of no wanting to gorge ourselves holds true still. Plus, I love meals where I can have a variety of mini things and eat with my hands. We usually fill some large party trays with an assortment of wonderfulness, fill our plates, and watch my favorite Christmas movie, A Christmas Story. The spread used to include luncheon meats and cheese wraps that we'd used to make mini sandwiches, but since my dad is the only one that eats said meats at this point, the menu has evolved some over the years. The last couple of years we'd been all about these mini quiches, a la Costco, but then last year discovered that one of them contained mini bacon bits (talk about a nasty surprise). This year, to replace the mini quiches, I decided to make a recipe that had been taunting me from pinterest for some time. It didn't cut up exactly like the picture, but it was still good nonetheless and a great addition to our Christmas Eve festivities.
Ingredients
I found the recipe on Pinterest, but it's also on the back of the puff pastry box
- 1 egg
- 1 Tbsp water
- 1/2 cup shredded Muenster cheese
- 1/4 cup grated Parmesan cheese
- 1 green onion, chopped (about 2 Tbsps)
- 1/8 tsp garlic powder
- All-purpose flour
- 1/2 of a 17.3-ounce package Puff Pastry Sheets (1 sheet), thawed
- 1 pkg. (about 10 ounces) frozen chopped spinach, thawed and well drained

Pre-rolling and baking
Preparation
- Heat the oven to 400°F
- Beat the egg and water in a small bowl with a fork
- Stir the Muenster cheese, Parmesan cheese, onion and garlic powder in a medium bowl
- Sprinkle the flour on the work surface. Unfold the pastry sheet on the work surface
- Brush the pastry sheet with the egg mixture. Top with the cheese mixture and spinach
- Starting at a short side, roll up like a jelly roll
- Cut into about 20 (1/2-inch) slices. Place the slices, cut-side down, onto 2 baking sheets. Brush the slices with the egg mixture (I struggled with getting it to cut and thus at this juncture just brushed the top of the roll and baked it. I had to cook it for a little longer to make sure it was cooked all the way through but other than that it worked)
- Bake for 15 minutes or until the pastries are golden brown. Remove the pastries from the baking sheets and let cool on wire racks for 10 minutes
11. Cranberry Breakfast Cake

The fam gathered around the Christmas breakfast table (with said baked good on their plates). Sister found an old Christmas memory book mother had kept for a couple years during the late 90s and shared some stories from Christmases past while we ate. It really doesn't take a lot to entertain us :)
I made a blueberry version of this cake last year and actually preferred it better. This time I used fresh cranberries and found it to be a little too tart, even with the addition of sugar. Live and learn. At least the peanut gallery wasn't ravenous and trying to rush the present opening process.
*Unfortunately, I got caught up in my Santa duties and forgot to properly photograph the dish, so since I wasn't that thrilled with it anyway, I'll just note that it came courtesy of Alexendra's Kitchen if you're interested in trying it out.
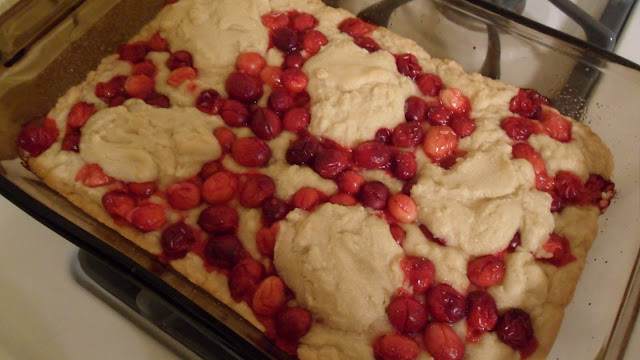
12. Cranberry Cookie Bars

In an attempt to overlap ingredients, I used the remainder of the cranberries from the breakfast dish to create this cookie bars for Christmas dinner dessert with the extended family. I made my favorite brownies with mini Christmas M&Ms but needed a non-chocolate dessert for my grandmother and aunt. Enter these puppies. They were much better than the breakfast cake (I'm guessing because the recipe called for way more sugar, helping to balance out the tartness of the cranberries more) and a nice change of pace from all the chocolate and icing I'd already consumed that day.
Ingredients
Recipe courtesy of Lick the Bowl
- 1/4 cup canola oil
- 2 Tbsps butter, softened
- 1 cup granulated sugar
- 2 large eggs
- 1 tsp vanilla
- 1 1/2 cups all purpose flour
- 1/8 tsp baking soda
- 1 1/2 cups cranberries, fresh or frozen (but not thawed)

Preparation
- Preheat oven to 350ºF and spray a 9x13-inch pan with nonstick spray
- In a large bowl, cream together canola oil, butter, and sugar. Add eggs and vanilla and beat well
- Add the flours and baking soda and stir just until the batter comes together
- Spread 2/3 of the batter in the bottom of the pan. Sprinkle with berries, then drop the remaining dough in spoonfuls over the fruit (It will spread as it bakes, and you don’t need to cover it all)
- Bake for 30-35 minutes, until golden and springy to the touch

And so concludes Gian's 12 recipes of Christmas (or as I like to call them, two of the longest posts ever). Hope you had a wonderful holiday season. I'm looking forward to lots of baking and cooking in the new year with all my new kitchen accessories. Can't wait to share what I come up with!
Happy 2013!
No comments:
Post a Comment