Pages

Thursday, January 31, 2013

Oh, Hello Again Winter...

Well this has been quite the crazy weather week in the District. We closed out last week with a dusting of snow and a slow start to the work week due to ice and sleet, and then Tuesday happened. The winter coats and Uggs went away and we got a glimpse of spring. For me, that glimpse was plenty. I know, I'm awful, but I forgot how much I hate running and walking in any temperatures above 50. It's crazy, I know. It's mostly because I hate sweating more than anything, but sweat like a crazy person seemingly the minute I get the slightest bit warm. I was drenched running and sweating upon arrival at the metro the last two days. Color me not amused. 

That being said, you can imagine my joy when the cold returned this morning! The wind was a little much, it was nice to feel cold air again. Unfortunately, I didn't get to greet the day with a morning run because I was ill. Not sick-ill, but I'd had a horrid migraine on Sunday that never quite went away. Worried that it was lasting so long, my papa accompanied me to the local urgent care center this morning. After a few shots (in the butt/back and super painful...I'm still a little traumatized from this) I spent the day at home, resting and taking it easy with Aussie. She's a good nurse. I'm starting to rally, so hopefully I'll get to take advantage of some cold weather running tomorrow morning. 

In the meantime, as you might suspect, there wasn't a whole lot of cooking going on in my kitchen today. As luck would have it, I found an unshared recipe that's perfect for warming up on chili days: Butternut Squash Risotto

I made risotto for the first time back in the fall, when I was loving all things pumpkin. It was delicious, but it took forever to make, even in the crockpot. Wanting to try my hand at risotto again, but pressed for time, I found this quick recipe. I was a little skeptical (it's made mostly in the microwave) but it worked like a charm. The longest part of this one was probably roasting the butternut squash....and there was may more than I needed to I definitely had some as a cooking/pre-dinner snack. I have no shame. 

Butternut Squash Risotto 


Ingredients
Inspiration found here

  •  1/4 cups uncooked Arborio rice 
  • 2 tsp olive oil 
  • 2 1/2 cups vegetable broth
  • 1 cup water
  • 1/2 of 1 medium butternut squash, roasted and diced
  • Salt and pepper to taste
  • 6 Tbsps grated Parmesan cheese 

Preparation
1. Preheat oven to 425 F

2. Slice butternut squash in half, length-wise, removing seeds and strings

3. Drizzle both halves with olive oil and place face down in a 9x13 baking dish. Bake for 20-25 minutes or until tender

4. Meanwhile, combine rice and oil in a 1 1/2-quart microwave-safe dish, stirring to coat. Microwave, uncovered on high for 3 minutes

5.  Add broth and 1 cup water to rice mixture; microwave, uncovered on high for 9 minutes

6. Stir well; microwave, uncovered, on high for 6 minutes

7. Remove from microwave; let stand 5 minutes or until all liquid is absorbed

8. Once squash is cooked, allow to cool slightly to avoid scalding your fingers and then remove skin and dice into cubes

Love roasting butternut squash

9. Puree 12oz (about one of the halves) of butternut squash using a hand blender (love this thing!!)

10. Mix pureed squash, cheese, salt and pepper together with cooked risotto


Plate and serve as desired (I added asparagus on the side of this version to give it a little color)


Tuesday, January 29, 2013

Staging a Comeback

It's been a rough cooking week for me. First, I failed horribly at cinnamon rolls. Then, my valiant attempt at cake batter sugar cookies was a huge, raw, doughy flop as well. I was on the cusp of giving up, hanging up my apron, taking to my bed, and never baking again. And then the clouds passed and a recipe was gifted to me at work. It was a sign, it was time for me to get back in the kitchen. 

My return to the kitchen was actually two-fold. Before things went arye on Sunday with the cinnamon rolls, I made some killer mac and cheese. It was a rough day (I spent most of it recovering from the beer run and nursing a horrid migraine) and all I wanted was some mac and cheese. The good thing about living in the city without a car is that I'm often too tired to walk to the store to feed my random food cravings. The bad thing is that sometimes I can't move past my food cravings and thus begin to obsess over them. That happened on Sunday. I obsessed for hours over mac and cheese and finally decided I needed to find a recipe on the interweb that would put to rest my quest for mac and cheese once and for all. And I did.

Not only was it so much healthier than the store bought powdered cheese variety, but it helped nurse me back to health (that and sleeping for most of the day on my couch). Recovered and making my way through the work week, I decided to spruce up the leftovers and make a more veggie-friendly dish tonight. It was the perfect excuse for a lunch time trip to Trader Joe's in the unseasonably warm temperatures. With veggies in tow, I returned to the kitchen tonight and created not one, but two killer dishes. Good news world, Gian's back!

Brussels Sprout, Mushroom, and Onion Mac and Cheese


Ingredients
Adapted from this Easy Mac and Cheese 

  • 1 box whole wheat pasta shells
  • 1 1/2 cups almond milk
  • 2 Tbsps all-purpose flour
  • 2 cups shredded cheese (I used a white and yellow blend I had on hand)
  • 1/2 of a medium onion, diced
  • 1 cup mushrooms, sliced
  • 2 cups brussels sprouts, sliced in half
  • salt and pepper to taste

Preparation

  1. Bring pot of water to a boil for pasta and cook pasta according to directions on package (usually about 8 minutes)
  2. While the pasta is cooking, saute brussels sprouts, onions, and mushrooms until tender and brussels sprouts are beginning to brown (be careful not to over cook the brussels sprouts or they will taste bitter)
  3. Set veggies aside and drain pasta. Don't combine
  4. Next, prepare the cheese sauce. Warm 1 cup of milk in a saucepan over medium heat
  5. Whisk together remaining 1/2 cup of milk and flour until there are no remaining lumps
  6. When milk in saucepan begins to steam, add milk-flour mixture to it. Continue to whisk gently until milk thickens slightly to the consistency of heavy cream [about 3-4 minutes]
  7. Turn the heat on saucepan to low and begin to add the cheese in small handfuls  mixing after each batch until melted and creamy
  8. Combine cheese sauce with pasta and toss until evenly coated. Add salt and pepper to taste
  9. Add veggies to mac and cheese, warming if needed
  10. Dig in! 


And to finish off the meal, I made these delicious cookies. I was gifted this recipe by a co-worker that knows my love for baking and it was just what I needed to pull me out of my slump. I'm usually not a huge peanut butter cookie fan, but these are just the right combo of peanut butter and chocolate. Love, love, love!

Peanut Butter Chocolate Chip Cookies


Ingredients
Original found here

  • 1/2 cup butter, softened
  • 1/2 cup peanut butter
  • 1/2 cup granulated sugar
  • 1/2 cup packed brown sugar 
  • 1/2 tsp baking soda
  • 1/2 tsp baking powder
  • 1 egg
  • 1/2 tsp vanilla
  • 1 1/4 cups all-purpose flour
  • 1/2 Tbsp almond milk (add at to end make dough smooth and creamy)
  • 1/2 cup semi-chocolate chips 

The first batch, despite my paranoia about baking them too close together, or for too long, still resulted in a less than desirable (fluffy-wise) cookie. Even on their worse day, these were still better than all the ones I made yesterday!

Preparation


  1. In a large mixing bowl beat butter and peanut butter with an electric mixer for about 30 seconds
  2. Add the granulated sugar, brown sugar, baking soda, and baking powder and beat until combined, scraping sides of bowl occasionally
  3. Beat in the egg and vanilla until combined
  4. Add in the flour in thirds, mixing completely during each batch
  5. Add milk to make dough extra creamy and chill dough before baking
  6. Preheat oven to 375 F. Drop cookies dough balls using a teaspoon onto a parchment paper-lined baking sheet
  7. Bake for 7-9 minutes or until light brown on top
  8. Transfer to rack and cool before serving....good luck not eating them off the tray :) 

Monday, January 28, 2013

What the What?!

I don't know what is happening to my baking skills!? Is baking all of a sudden like running, I take a week off and all abilities are lost?! I'll be honest, I'm borderline hysterical. 

So last night you'll recall that I failed miserably at my first attempt to create cinnamon rolls. They were actually so bad that after I pried them out of the pan in the vein hope that I'd eat them again, I threw them away in the light of day. I never throw food that hasn't gone bad away, so you know they must have been bad. 

In an attempt to restore my confidence in the kitchen, I decided to take advantage of working from home on a gloomy Monday to create a new and fun cookie that I could also bring into the office and share with coworkers. Even with the best of intentions, it was once again not meant to be my day in the kitchen. Oh Gian, where are you to go from here?!

Similar to yesterday, I will share this recipe with you because I believe it was my fault that the cookies turned out like they did, not the fault of the recipe. This is quickly becoming the year of recipe redos?! Get it together Gian, get it together.


Cake Batter Sugar Cookies
Adapted from one of my fav sites: Sally's Baking Addiction

Ingredients

  • 8 Tbsps (1/2 cup) butter, softened
  • 1 cup sugar
  • 2 large egg yolks [this is one point where I messed up, I dumped the whole egg in]
  • 1 tsp vanilla extract
  • 1/2 tsp baking powder
  • 1/2 tsp salt
  • 1 1/2 cups all-purpose flour
  • 3/4 - 1 cup rainbow sprinkles
Preparation
1. Preheat oven to 350F

2. Combine butter and sugar together in stand mixer with paddle attachment until creamy

3. Add egg yolks, vanilla extract, baking powder, and salt. Mix until well combined

4. Add flour in 1/2 cup increments until a dough ball forms. Stir in sprinkles by hand

5. On a parchment paper lined baking sheet, create Easter Island looking balls of cookie dough. [This technique is totally legit. TF swears by it and he's kind of my cookie-making guru. More technically speaking, when the cookies are made tall to begin with they spread less, resulting in a fluffier cookie at the end]


This Easter Island business is completely my own naming....every time I see them I just can't help but think that they look like the statutes on Easter Island

6. Bake for 8-10 minutes, making sure they don't brown. [It is here that I also went wrong. Not only did I put my cookies too close together, causing them to run together into a pseudo-giant cookie mass, but my antics caused them to not cook all the way through due to lack of space. Double fail]

7. Allow cookies to cook for a few minutes on tray before moving to wire rack for the remainder of their cooling time

In my perfect baking world, I would be showcasing a beautifully stacked pile of Christmas sprinkle-clad yumminess here

Instead, I broke out one of my new cookie cutters (a mitten) and tried to salvage some of the half cooked/half doughed mass. They were better warm. In the light of day, they may be joining the cinnamon rolls in the trash. 

Clearly I need to re-acclimate myself with baking ASAP. I cannot go on like this!


.

Sunday, January 27, 2013

Winter Whirlwind

Goodness, gracious. I have no idea where the past two weeks went. Despite what has otherwise seemed like a somewhat slow month, the last two weeks rushed by in a flurry of cold and fun. I dabbled in cooking a little during this time, making an old favorite to help keep warm, as well as some delicious cookies that I'm currently kicking myself for forgetting to photograph (fear not, I'm totally making them again asap...they were, roughly put, one of the most sinfully addictive things I've ever made). With no recipes to share via pictures from the last two weeks, it seems only fitting to share the highlights from the activities that keep me out of the kitchen and away from my blog (as told via instagram):


 First there was grilled cheese and it was good. A delectable treat courtesy of one of my favorite hangouts [Stoney's]

And then TF came to town and had some killer Asian cuisine [a la Meiwah]

And I finally got to experience the wonder that is Eatonville

Before we knew it, it was inauguration time

It was a chilly day, but not nearly as cold as last time....and my sleeping bag coat is the best thing ever invented 


I beat my record for cold weather running (now set at 16 degrees) and it got so cold it finally snowed


Bax greeted her first snow of the year with style and grace


And I capped for the whirlwind two weeks with a beer 1K. Best idea ever!

Getting back into the swing of things, I kicked off my return to cooking today by making some killer mac and cheese (to be featured tomorrow) and trying my hand at some homemade cinnamon rolls with a twist. 

As is often the case, I began this recipe with the best of intentions. I fully expected to emerge from the kitchen with Cinnabon level goodness. This did not happen. Worse, the one thing I did succeed at was finally overdoing it on my beloved cinnamon. Clearly I have a lot to learn before I perfect the art of cinnamon making. Because I believe it was me that failed, not the recipe, I do still want to share it with you. It's my goal to try it again (with more patience  as I admittedly grew antsy towards the end of the process and didn't let the dough rise as long as it was supposed to), hopefully it'll turn out better for you than it did for me, at least this time around. 

Cinnamon Rolls with a Twist
Adapted from The Picky Eater Blog


Ingredients
  • 1 cup almond milk
  • 1 Tbsp canola oil
  • 1 Tbsp sugar
  • 1 tsp table salt
  • 1 Tbsp yeast, about 1 package
  • 1 1/4 cups whole wheat flour, sifted, divided
  • 1 1/4 cups all-purpose flour, sifted, divided
  • 1/4 cup unpacked brown sugar
  • 1/4 cup agave syrup
  • 2 tsps ground cinnamon
  • 1/4 tsp ground nutmeg
*Optional icing ingredients: 1/2 cup powdered sugar, 1/2 Tbsp low fat milk, 1/4 tsp vanilla extract


Preparation
  1. Stir together milk, canola oil, sugar and salt in a small saucepan. Heat to lukewarm
  2. Pour yeast over 2 tablespoons lukewarm water and let sit 5 minutes.Stir the yeast/water mixture into the milk mixture
  3. Transfer milk mixture to a large mixing bowl and beat in half the flour by hand or with an electric mixer.
  4. Mix in enough remaining flour to make a soft dough. Let rest 10 minutes; knead well on a floured board or with an electric mixer and dough hook; let rest 10 minutes
  5. Spray a large, clean bowl with cooking spray, add dough, cover with plastic wrap and let rise in a warm place until doubled, about 1 hour
  6. Lightly coat a 9-inch round baking pan with cooking spray
  7. Turn the dough onto a floured surface and roll into a 12 x 10-inch rectangle. Spray the rolled out dough with cooking spray
  8. Stir together brown sugar, agave nectar, cinnamon, and nutmeg; brush over dough
  9. Roll up tightly, like a jelly roll, and cut into 12 pieces
  10. Place buns cut-side up in baking pan
  11. Cover with plastic and let rise until doubled, about 1 hour
  12. Preheat oven to 350°F.
  13. Bake buns until firm and nicely browned on top, 30 minutes. 
  14. Remove from oven and top with icing (if desired)
Post cooking....not exactly what I was shooting for #cinnamonrollfail

Monday, January 14, 2013

Salty Sweet Sensation

I've never been much of a fan of new year's resolutions. I actually hate this time of year because the gym is overrun with an influx of people resolving to workout more. In recent years, I've adopted the coping mechanism of running outside as much as possible during the month of January while waiting the for the novelty to wear off and the gym crowd to return to normal levels. This year, to help lessen my pain, I decided to switch gyms. I'd been at my old gym for over 2 years and while I enjoyed the price, I greatly disliked how far it was from my apartment (a solid 10 minute walk...which isn't super far, but in the winter or rain it makes for a lot of excess dressing and undressing), to the point that I was going twice a month at best. Not ok. So, with the switch official (love being two blocks away), I am not only in love with the gym again (we've never had a super close relationship....I hate weights and love running outside), but I have also become a Pilates convert. I've been doing yoga about once a week for some time, but more for relaxation than a workout. But Pilates, how did we go so long without crossing paths?! Oh the things I've gone without!

Back in town and with a new workout regime underway, my appetite returned as well. Last week, with my holiday sweet tooth still in high gear, I  broke out the mixer and began to randomly throw things into the bowl...well, maybe not that extreme, but I did create a wonderful hodgepodge of sweet and salty, all disguised in a cookie to help ease me back into the pains of a full work week. 

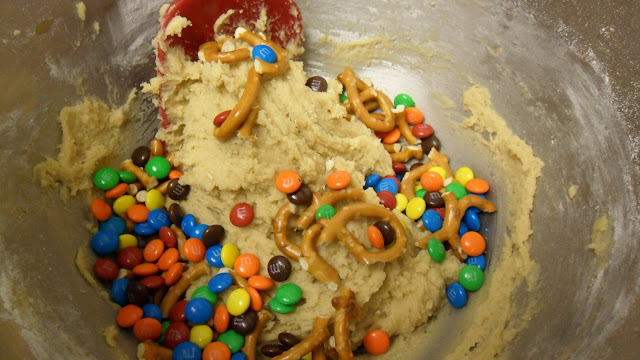
Chocolate Chip M&M Pretzel Goodness


Ingredients
  • 1/2 cup (1 stick) salted butter, softened to room temperature
  • 1/2 cup light brown sugar
  • 1/4 cup sugar
  • 1 egg
  • 1 tsp vanilla extract
  • 1/2 tsp baking soda
  • 1 and 1/4 cups all purpose flour
  • 3/4 cup bite size M&Ms
  • 3/4 cup pretzel pieces
  • 3/4 cup white chocolate chips
Preparation
1.  In a large bowl with paddle attachment, cream the butter and sugars together at medium speed.  Add egg and vanilla
2. Slowly mix in the baking soda and flour. Fold in the M&Ms and pretzels
I greatly enjoyed adding the of ingredients....pretzels

Mini M&Ms next

And finally the white chocolate chips 
3. Chill the dough for at least 30 minutes
4. Preheat oven to 350 degrees. Spray a 9x9 inch cake pan with cooking spray. Bake for 25-30 minutes or until lightly golden. Allow to cool before cutting....good luck waiting that long :) 
Ready to bake! 


Sunday, January 13, 2013

Warming Up from the Inside

I started the new year with plans to really up my blog posting frequency. This plan lasted all of a day, although it wasn't for a lack of trying. The problem, as I discovered while unpacking from my time away from the District, was that my camera cord was nowhere to be found (resulting in my photos being trapped on my camera). What the what?!

It's been a roller coaster ride of emotions. First I was angry. I usually keep it in an outside pouch on my suitcase, along with a backup phone charger, but neither were in their trusted spot. I'd checked my bags on my travels to and from OK and I was livid at the thought that they had been stolen. I eventually found the phone charger elsewhere, but after making my parents ransack their home, the camera cord was still nowhere to be found. 

To remedy things, I turned to the trusty wonder that is Amazon and ordered a replacement cord. Waiting in anxious anticipation, I was thrilled when the replacement arrived in the mail. My anticipation quickly turned to disappointment upon learning that I ordered the wrong cord. Curses. The roller coaster finally came to an end when I was visiting my parents over the weekend. I was helping them take down and pack away all the Christmas stuff and low and behold, the missing cord resurfaced. Victory! So, now that I have regained access to my photos and without further ado, my first non-dessert recipe of the new year: Minestrone Soup.

This weekend aside, it's been frigidly cold in the District since my return and nothing has sounded better than a nice, warm bowl of soup. I'm not a huge fan of canned soups and was really itching to get my crock pot out and back in the swing of things again. Unfortunately, I ended up finding a stove top soup recipe that I just couldn't pass up, so my crock pot will lie in wait a while longer. My favorite part of this recipe was getting to break in some of the new kitchen tools I got for Christmas.

One of my most exciting Christmas gifts was a new knife set. Aside from a decent paring knife, I'd previously been using a cheap set that I bought at Target during my college years and they were simply not cutting it any more (partial pun intended). The only drawback of my new knife set was how many times I managed to cut myself during my first day with them (clearly not used to a razor sharp blade in the kitchen). That aside, they have been a wonderful addition to the cooking process. Equally as exiting was my new garlic chopper toy. I purchased this during my trip with TF to see his mom post-Christmas. As I mentioned briefly in my last post, she owns a kitchen goods store (also known as my version of an adult toy story) and in addition to helping TF pick out goods, I found some things for myself as well. One such find was this amazing garlic roller chopper [my words for it]. I don't know how I lived so long without this thing. It's tiny so it stores well, but with it's giant tonka-like wheels, it does wonders in minutes. Hello perfectly minced garlic! I had so much fun using it that I was almost sad when everything was prepped and ready to cook (which was super easy, fast, and muy delicioso).

Easy Minestrone Soup


Ingredients
Adapted from Two Peas and Their Pod
Serves 8-10
  • 2 Tbsps olive oil
  • 1 small onion, chopped
  • 3 cloves garlic, minced
  • 1 carrot, peeled and diced
  • 1 celery stalk, diced
  • 1 zucchini, diced
  • 1 cup fresh or frozen green beans
  • 1 can diced tomatoes
  • 4 cups vegetable broth
  • 2 cups water
  • 1 (14 ounce) can kidney beans, rinsed and drained
  • 1 cup whole wheat elbow macaroni
  • 1/2 tsp dried oregano
  • 1 tsp dried basil
  • Salt and pepper, to taste
  • Parmesan cheese, for garnish
Waiting for the magic to happen

Directions

1. Heat olive oil in a large stockpot. Add onion, garlic, carrot, and celery. Cook for about 5 minutes, or until lightly browned

2. Add in zucchini, green beans, and diced tomatoes. Stir in vegetable broth and water. Add beans, macaroni, oregano, and basil

3. Simmer until vegetables and macaroni are tender-about 35 minutes

4. Season soup with salt and pepper and serve warm. Garnish with Parmesan cheese, if desired

Outside TF's mom's store (with her festive-holiday creation)...I love a good photo op


Monday, January 7, 2013

New Year, New Recipes

I may be a week late, but now that the (extensive) Christmas recap is over (although it looks like it was greatly enjoyed, which I'm always thrilled to see), I can officially usher in the second year of my blog. Wow, can't believe it's already been a year since I kicked things off with this utterly addictive apple sauce?!

I've had a blast cooking and sharing my creations with you over the past year, and the fun's just getting started. Because my friends and family know me so very well, Christmas brought with it an assortment of new kitchen toys for me to play with. I kind of felt like a kid again...or at least a very nerdy adult :) And, to make my kitchen-accessory-filled-Christmas even better, I made a post-Christmas trip with TF to visit his mom. Admittedly, this is a weird thing to be excited about, but she not only owns a kitchen store, but for the last couple of years she's let TF and his brother raid it as part of their Christmas present....and guess who got to help this year! I was allowed to pick out a few things as well, which made the trip even sweeter. I'll get back to this trip in more detail in a future post, but for now, time for my first baking foray of the new year.

Over the weekend, I gathered with friends for a little celebration to welcome the new year. Our hosts for the evening had the grand idea of jazzing up our gathering, and bringing an air of sophistication to the evening, by making it a fancy cocktail night. Genius. To accompany the fine drinks, I volunteered (as is my custom) to bring a baked good. Since I bake for them a lot, I am constantly trying to outdo my previous self. I'd bought a bag of toffee chips during the holiday season that had gone unused and served as my inspiration for my first run at toffee-inspired baking.

Breaking in my new Anthropologie apron and measuring cups


Toffee Oat Butterscotch Cookies


Ingredients
Adapted from Annie's Eats

  • 3/4 cup all-purpose flour
  • 1/2 tsp baking soda
  • 1/2 tsp ground cinnamon
  • 1/4 tsp salt
  • 1 stick unsalted butter, softened
  • 1/2 cup brown sugar
  • 1/4 cup granulated sugar
  • 1 large egg
  • 1/2 tsp vanilla extract
  • 1 1/2 cups old fashioned oats
  • 3/4 cup butterscotch chips
  • 1/4 cup toffee bits
Preparation

  1. Preheat the oven to 350 F and line baking sheets with parchment paper
  2. In a bowl, combine flour, baking soda, cinnamon and salt. Stir to blend, and set aside
  3. In the bowl of an electric mixer, combine the butter and sugars and beat on medium-high speed until light and smooth, about 2-3 minutes
  4. Beat in the egg until incorporated. Blend in the vanilla. With the mixer on low speed, mix in the dry ingredients just until incorporated. With a spatula, fold in the oats, butterscotch chips and toffee bits until evenly combined
  5. Drop scoops of dough (about 2 Tbsps each) onto the prepared baking sheets, a few inches apart. Bake for 12-15 minutes, until just set and light golden, rotating the pans halfway through baking. Let cool on the pans about 5 minutes, then transfer to a wire rack to cool completely
The hosts for the evening loved my latest creation. Starting off the new year with high praise, that's how I like to roll.


Saturday, January 5, 2013

Happy New Year: Christmas Recap Part 2

Despite the passage of time, I'm still mourning the loss of Christmas. I can't decide if it's better or worse that the decorations in my apartment and office buildings are still up. I love them both dearly, but prior to leaving town for the holidays I'd said my good-byes and begun mental preparations to return to them having been packed away until next year. With that not being the case, I find myself playing a waiting game. Will they be gone tomorrow, or the next day, or the day after that? It's impossible to know, although I'm fairly confident that the deeper into January we get the greater the likelihood of them disappearing in the night becomes. 

In the meantime, I have the remainder of my Christmas recipes to share! Part 1 of this spirited series brought the first 5 of my "12 recipes of Christmas"and without further delay, I present to you the remaining 7:

6. Banana and Pomegranate Muffins


Seemingly for years, I've been fascinated/borderline obsessed with pomegranates. I generally enjoy their taste and for years I've been trying to build up the courage to break into one on my own. My hesitation to take the plunge stems largely from my fear of making a mess of red dye everywhere, as well as not knowing what I was was doing/getting myself into. Would it be a lot of work? Would I hate it? Would I ruin anything and everything that the pomegranate comes into contact with? So many questions. 

Finally, I just said to hell with it and took the plunge. I figured that since they hand out instructions with the display at the store that I wasn't the only one who was confused/scared, and if others could successfully cut open and dine on one of winter's signature fruits, so could I. It wasn't nearly as messy as I'd feared (although don't get me wrong, I definitely had a few rogue seeds leave a trail of red on my counter and kitchen floor, although it came up easily) and actually kind of fun. I used the seeds to create some delicious muffins, which I included in a gift basket of holiday cheer that I made for the doormen at my apartment building, which they loved. Hopefully that'll buy me another year of forgiveness for Baxter's occasional harsh feelings towards them. 

Ingredients
Recipe adapted from Jen's Favorite Cookies

Pomegranate Syrup
  • 1 cup pomegranate arils
  • 1/2 cup sugar
  • 1/4 cup water
Muffins
  • 1/2 cup butter, softened
  • 2-3 very ripe bananas
  • 1/2 cup brown sugar
  • 2 eggs
  • 1/2 tsp salt
  • 1 tsp. baking soda
  • 2 tsp baking powder
  • 3/4 cup quick oats, plus 1/2 cup or so for topping
  • 1 1/2 cups flour
  • 1/2 cup pomegranate syrup (see above)
Preparation

1. For pomegranate syrup: Combine arils, sugar, and water in a pot. 
Bring to a boil, and let simmer for about 10 minutes, until syrup becomes thick and dark. Remove from heat


2. For muffins: Cream butter and sugar. Add bananas and eggs, and mix well

3. Add soda, baking powder, and oats and mix well. Add flour and mix until combined. Add ½ cup of the pomegranate syrup, and mix well


4. Divide batter evenly between 12 muffin cups and top with remaining oats


5. Bake at 375 for 18-22 minutes, until lightly brown on top

*These were quite possibly the most perfect muffins I have ever made, not a single one was brown on the bottom (and I have a disappointing track record with muffins) 

Plated and ready to be wrapped 

Inside the box of tricks. I fell in love with these treat boxes this year.

Wrapped and ready to be delivered from Gian and Bax. Yes, I'm that person.

7. Secret Santa Gifts


This year my team at work decided to do Secret Santa. I was thrilled from the get-go, and even more so when the rule that we had to make the gift was announced. Since that's what I was going to be doing anyway, I was excited to see what others came up with. We drew names and I got the only vegan on the team. While some may have been disheartened, this made my day. I already knew I was going to be giving my trademark treat bags to the rest of the team and had been struggling for sometime with what to get her. Enter my plethora of mason jars and some time on the interweb and what do you get:

Vegetarian Black Bean Chili in a Jar
Recipe courtesy of Recipe Goldmine

Ingredients
  • 3 cups black beans, sorted
  • 3 Tbsps dehydrated onion 
  • 3 Tbsps granulated garlic 
  • 1 tsp crushed oregano 
  • 2 tsps salt 
  • 1/4 to 1/2 tsp cayenne pepper (do not omit)
  • 1 1/2 cups brown rice
Preparation
  1. Put black beans into the bottom of a jar
  2. Layer rice on top (or keep rice in a separate bag for a less pretty but more hassle-free version)
  3. Combine spices in a zip-type bag and place on bag on top of rice and beans
  4. Decorate (if desired) and attach this recipe for cooking:

Wash beans. Put in pot with contents of seasoning bag. Add 1 tablespoon olive oil and cover beans with 2 inches of water. Bring to a boil and simmer until very well done (about 2 hours). Beans should be very soft. Add water as needed to keep beans from sticking. There should be some liquid left on beans when done.

To cook rice, put 3 cups water and 1 teaspoon salt into a pot and when it boils, add rice. Lower heat, cover and steam for 20 minutes.

Serve about 1/2 cup rice in bowl, and ladle beans over the top. Sprinkle with minced cilantro, finely chopped green onion, and a squeeze of lime juice.

And, in a very appropriate twist of Secret Santa fate, quite possibly the only person that can rival me craft-wise drew my name. I was seriously impressed (and I'm a tough audience :))

Peppermint foot scrub

Brownie peppermint cookies (one of this year's pinterest items that I never got to) on a homemade peppermint plate?!

8. Cream Cheese Wrap-Ups


This recipe and I have had a very up and down relationship. It was introduced to me by a coworker a year or so ago at a work gathering and I fell in love with it. I tried to recreate it for a party last year and it tasted nothing like the original. My friends liked it, but knowing what it was supposed to taste like, I was underwhelmed. And so, I parted ways with the recipe...at least for a time.

During our work holiday party this year, the same coworker made the original version yet again, reigniting my desire to recreate it on my own. And so back to the kitchen I went. I begged (well, more so just asked once as she was very willing to share and offer words of encouragement) for the recipe again (I'd thrown it away after my failings last year) and away I went. This time, I nailed it! They tasted just like the original version that I'd tried to create last time around. What I find most odd about this recipe is that, taken individually, I pretty much hate everything in the dish. But put them together and roll them up in a fun tortilla and I'm in love. These travel and store really well so they're a great make-ahead app to take to parties (which is exactly what I did)

Ingredients

  • 2 blocks of cream cheese (let sit out for a few hours to get soft)
  • 1 small can (4 oz) chopped black olives
  • 1 small can (4 0z) mild diced green chiles (make sure you get the mild green chiles, not jalepenos)
  • Garlic salt to taste
  • 1 package of flour tortilla wraps (Sundried Tomato Basil and Garden Spinach Herb were recommended, I love both, just don’t use low-carb or low-cal wraps because they’re too mushy, especially if you make it the night before)


Preparation


1. Mix everything together with really good with a spoon (no blender) so it’s all blended together and smooth


2. Spread it thinly on a wrap, and roll it up. Make sure you spread it in a thin layer. If you use too much cream cheese, it globs up as you’re rolling it up, makes it messy to cut, and it doesn't taste very good with too much filling. 

3. Cut into small bite-size pieces. You can throw away the end pieces because they don’t stay rolled up (I may or may not have eaten these as a snack while cooking :))


 9. Christmas Sugar Cookies


I'm not exactly sure how or when it started, but at some point in my teenage years, Sister and I began the tradition of making Christmas cookies on or near Christmas Eve. Despite my mother's aversion to cooking, I can't remember a Christmas without decorating Christmas cookies. The process has evolved a lot over the years, from rolls of pre-made Pilsbury dough and canned icing to making our own ingredients. My cookie cutter collection has also grown exponentially over the years. It's actually slightly out of control at this point, but I love making Christmas cookies so it's a good problem to have. It just doesn't seem like Christmas until these icing clad and colorful shapes make their debut. This year I tried out a new sugar cookie recipe and loved it. It was the first time the cookies didn't turn into giant masses of dough upon baking. I was very impressed and will be using this recipe for many years to come!

To make the experience even more fun, I enjoy adorning my Santa apron....and we jazzed it up this year with fun hats, hot apple cider, and some Straight No Chaser Christmas jams

Ingredients
Best dough ever courtesy of Catch my Party
  • 2 3/4 cups all-purpose flour
  • 1 tsp baking powder
  • 1/2 tsp salt
  • 1 cup  butter, softened
  • 1 1/2 cups granulated sugar
  • 2 eggs
  • 1 1/2 tsp vanilla extract

Seriously, they held their shape perfectly! 

Preparation


1. Combine flour, salt, and baking powder into a bowl, mix, and set aside

2. In another bowl, add the softened (room temperature) butter, eggs, sugar, and vanilla. Beat with an electric mixer until smooth 

3. In three or four batches, add the dry ingredients to the wet, mixing until incorporated

4. Roll roll the dough out using a rolling pin and cut out shapes using a cookie cutter dipped in flour 


5. Bake at 350 degrees for 8-10 minutes

6. After cooled, icing (using my favorite buttercream of course) and decorate as desired

Sister's favorite cookie cutter (courtesy of TF's mom's kitchen store) turned cookie. 
She loves the Sooner state the most.

10. Spinach and Cheese Swirls


Another Christmas tradition that has existed for as long as I can remember is our Christmas Eve "buffet." In hindsight, I believe the tradition spurred from my mother not wanting to cook a big meal or do a bunch of dishes the night before Christmas (when we'd be having a big meal and making them get up at the crack of dawn to begin opening presents), but the logic of no wanting to gorge ourselves holds true still. Plus, I love meals where I can have a variety of mini things and eat with my hands. We usually fill some large party trays with an assortment of wonderfulness, fill our plates, and watch my favorite Christmas movie, A Christmas Story. The spread used to include luncheon meats and cheese wraps that we'd used to make mini sandwiches, but since my dad is the only one that eats said meats at this point, the menu has evolved some over the years. The last couple of years we'd been all about these mini quiches, a la Costco, but then last year discovered that one of them contained mini bacon bits (talk about a nasty surprise). This year, to replace the mini quiches, I decided to make a recipe that had been taunting me from pinterest for some time. It didn't cut up exactly like the picture, but it was still good nonetheless and a great addition to our Christmas Eve festivities.

Ingredients
I found the recipe on Pinterest, but it's also on the back of the puff pastry box
  • 1 egg
  • 1 Tbsp water
  • 1/2 cup shredded Muenster cheese
  • 1/4 cup grated Parmesan cheese
  • 1 green onion, chopped (about 2 Tbsps)
  • 1/8 tsp garlic powder
  • All-purpose flour 
  • 1/2 of a 17.3-ounce package Puff Pastry Sheets (1 sheet), thawed
  • 1 pkg. (about 10 ounces) frozen chopped spinach, thawed and well drained

Pre-rolling and baking

Preparation
  1. Heat the oven to 400°F
  2. Beat the egg and water in a small bowl with a fork
  3. Stir the Muenster cheese, Parmesan cheese, onion and garlic powder in a medium bowl
  4. Sprinkle the flour on the work surface. Unfold the pastry sheet on the work surface
  5. Brush the pastry sheet with the egg mixture. Top with the cheese mixture and spinach
  6. Starting at a short side, roll up like a jelly roll
  7. Cut into about 20 (1/2-inch) slices. Place the slices, cut-side down, onto 2 baking sheets. Brush the slices with the egg mixture (I struggled with getting it to cut and thus at this juncture just brushed the top of the roll and baked it. I had to cook it for a little longer to make sure it was cooked all the way through but other than that it worked)
  8. Bake for 15 minutes or until the pastries are golden brown. Remove the pastries from the baking sheets and let cool on wire racks for 10 minutes
*Also note: for best results, make sure to remove as much liquid as you can from the spinach before adding it to the pastry. If it's too wet, it may make the pastry soggy.

11. Cranberry Breakfast Cake


The fam gathered around the Christmas breakfast table (with said baked good on their plates). Sister found an old Christmas memory book mother had kept for a couple years during the late 90s and shared some stories from Christmases past while we ate. It really doesn't take a lot to entertain us :)

Last year I began to tradition of taking a break from present opening to have a freshly baked breakfast treat. I always assume the role of Santa as I typically know what everyone else has gotten each other and like to puppet master the gift opening so the best presents are saved for last. Since Sister and I are older now, we tend to get our parents more presents which, when combined with ours, can make present opening extend for some time (I also don't let people open presents at the same time...I like order to the opening process). Since I like to drag out present opening for as long as possible (in an effort to prolong Christmas) the others tend to get a little cranky after not eating for hours on end (and you thought I was joking about this taking a while). To remedy this, I instituted a breakfast pause between stocking opening and gift opening. 

I made a blueberry version of this cake last year and actually preferred it better. This time I used fresh cranberries and found it to be a little too tart, even with the addition of sugar. Live and learn. At least the peanut gallery wasn't ravenous and trying to rush the present opening process.

*Unfortunately, I got caught up in my Santa duties and forgot to properly photograph the dish, so since I wasn't that thrilled with it anyway, I'll just note that it came courtesy of Alexendra's Kitchen if you're interested in trying it out.

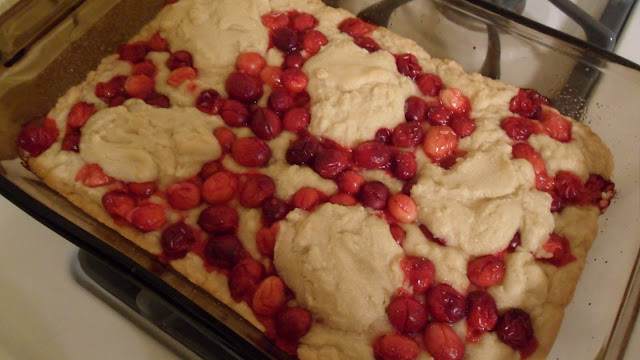
12. Cranberry Cookie Bars


In an attempt to overlap ingredients, I used the remainder of the cranberries from the breakfast dish to create this cookie bars for Christmas dinner dessert with the extended family. I made my favorite brownies with mini Christmas M&Ms but needed a non-chocolate dessert for my grandmother and aunt. Enter these puppies. They were much better than the breakfast cake (I'm guessing because the recipe called for way more sugar, helping to balance out the tartness of the cranberries more) and a nice change of pace from all the chocolate and icing I'd already consumed that day.

Ingredients
Recipe courtesy of Lick the Bowl
  • 1/4 cup canola oil
  • 2 Tbsps butter, softened
  • 1 cup granulated sugar
  • 2 large eggs
  • 1 tsp vanilla
  • 1 1/2 cups all purpose flour
  • 1/8 tsp baking soda
  • 1 1/2 cups cranberries, fresh or frozen (but not thawed)


Preparation
  1. Preheat oven to 350ºF and spray a 9x13-inch pan with nonstick spray
  2. In a large bowl, cream together canola oil, butter, and sugar. Add eggs and vanilla and beat well
  3. Add the flours and baking soda and stir just until the batter comes together
  4. Spread 2/3 of the batter in the bottom of the pan. Sprinkle with berries, then drop the remaining dough in spoonfuls over the fruit (It will spread as it bakes, and you don’t need to cover it all)
  5. Bake for 30-35 minutes, until golden and springy to the touch


And so concludes Gian's 12 recipes of Christmas (or as I like to call them, two of the longest posts ever). Hope you had a wonderful holiday season. I'm looking forward to lots of baking and cooking in the new year with all my new kitchen accessories. Can't wait to share what I come up with!

Happy 2013!