Pages

Monday, May 21, 2012

Mother's Day Treats

Mother's Day really took me by surprise this year, almost road runner style. It completely snuck up on me and then, just as quickly as it came, it was gone. I can't believe it was only last weekend! May has flown by, although I can't really say I'm upset by this, there's no point in delaying the inevitable...the onslaught of the heat-laden days of summer. Oh how I am already longing for the days of fall (or relocation to a cooler, more enjoyable climate), but I digress.

As is our custom for holidays, we spent Mother's Day up in the Keystone State (Pennsylvania). When my parents moved back to the east coast a few years (actually, wow, five years this fall) it wasn't long before they discovered the best crab cakes in Maryland. Growing up, Maryland's ability to do wonderful things with the blue crab was ingrained in me from a very young age. I was a fairly picky eater growing, but I never met a form of crab that I didn't like. My mother has always been somewhat of a connoisseur of crabcakes in particular, so when we discovered By the Docks, it was love at first bite. Periodically, we'll either eat there or get take out and shlep it across the Maryland line.


Heaven on a plate...I wish I had photographed him next to something else
so its true proportions could be understood :)

Since Mother hates eating out on Mother's Day, it was a take out kind of day. With crabcakes in tow we headed up to PA for a delightful feast, topped off with my creations for the day. Unfortunately, unlike the crabcakes, my desserts were not without disappointments.

I blame myself mostly, I don't take well to failure (in this case it was also due in part to the stupid heat, which served to melt them and from which they never quite recovered). Despite not being pretty, they were at least good and their tastes were well receieved, so the morale of the story is: the recipes are good. Keep them in a cool, dry place and you'll be golden.

Cheesecake Brownies
Inspiration found here

Ingredients

Brownie Layer
  • 1/2 cup unsalted butter, cut into pieces
  • 4 ounces unsweetened chocolate, coarsely chopped
  • 1 1/4 cups granulated white sugar
  • 1 teaspoon pure vanilla extract
  • 2 large eggs
  • 1/2 cup (65 grams) all purpose flour
  • 1/4 teaspoon salt

Cream Cheese Layer
  • 8 ounces full fat cream cheese, at room temperature
  • 1/3 cup granulated white sugar
  • 1/2 teaspoon pure vanilla extract
  • 1 large egg 
Making it was at least fun


Preparation
  1. Preheat oven to 325 degrees F and place the rack in the center of the oven. Have ready a 9 inch square baking pan that has been lined with aluminum foil 
  2. In a heatproof bowl, placed over a saucepan of simmering water, melt the butter and chocolate. Remove from heat and stir 
  3. Preheat oven to 325 degrees F and place the rack in the center of the oven. Have ready a 9 inch square baking pan that has been lined with aluminum foil 
  4. In a heatproof bowl, placed over a saucepan of simmering water, melt the butter and chocolate. Remove from heat and stir or whisk in the sugar and vanilla extract. Add the eggs, one at a time, beating well after each addition. Stir in the flour and salt and stir vigorously until the batter is smooth and glossy (about one minute) 
  5. Remove 1/2 cup (120 ml) of the brownie batter and set it aside. Spread the remainder of the brownie batter evenly onto the bottom of the prepared pan 
  6. Then, in the bowl of your food processor (or with a hand mixer), process the cream cheese just until smooth 
  7. Add the sugar, vanilla, and egg and process just until creamy and smooth (do not over process). Spread the cream cheese filling evenly over the brownie layer 
  8. Spoon 16 small dollops (4 rows with 4 dollops of brownie batter in each row) of the reserved brownie batter evenly on top of the cream cheese filling. Run a knife or wooden skewer back and forth through the two batters until you have a marble effect 
  9. Bake in the preheated oven for about 30 minutes or until the brownies are set and the cream cheese is just beginning to brown. (A toothpick inserted into the brownie comes out with just a few moist crumbs) 
  10. Remove from oven and place on a wire rack to cool completely. Then cover and refrigerate the brownies until they are firm enough to cut into squares (several hours or even overnight) 
  11. Once chilled, remove the brownies from the pan by lifting with the ends of the foil and transfer to a cutting board. With a sharp knife, cut into 16 squares. It is a good idea to have a damp cloth nearby to wipe your knife between cuts. Brownies can be stored in the refrigerator for several days. Serve cold or at room temperature (and don't leave any where too warm, as that was my downfall) 
Sister helped me salvage some for displaying on my beloved stand


I also made these fun lemon bars, but the heat was even less forgving to them. After bring allowed to chilll overnight, they re-hardened nicely and were very good. Biggest take away from the day: don't leave desserts in car during the summer months.


Wednesday, May 16, 2012

Thunderous Chickpea Salad

Basketball is back in my life, and more specifically, NBA basketball! I promise this isn't going to be a sports post (although I do have an unparalleled love for sports, especially football)! But I would be remised if I did not share my joy that not only is the NBA back in my life, but I actually have a team to cheer on in the playoffs! These are two HUGE accomplishments given how nonexistent the NBA has been in my life the last couple of years!


Growing up I LOVED basketball. My dad was a basketball player in high school and college and he started playing ball with me at a very young age. I can even remember the first time I sat myself down, determined to watch a basketball game in its entirety. Shaq still played for the Magic and I think it was one of the few times I cheered for him (he was never one of "my" players). My dad was thrilled to have someone to watch the game with, naturally, and my basketballness only grew over the years. Following in papa's footsteps, I tried my hand at basketball during my middle and early high school years before recognizing the writing on the wall: I was meant to watch basketball, not play it. It's ok, I'm much better for it. And so I watched it.


Unfortunately, since Oklahoma didn't have a NBA team at the time, I chose my favorite teams based on which players I liked the best. The only bad part about this was that, after Sir Charles, Reggie, and the others hung up their sneakers, I was left without a solid team to call my own. I wasn't too upset about it as I was deep in the throws of college by then and had plenty of Sooner football (and from time to time, basketball) to keep me happy. But after March Madness came to an end I always knew it was going to be a long, hot, sports-free summer until football returned (I'll interject here that being raised in a football state, baseball has never really been my jam; although living around several teams now, I do enjoy a good day at the ballpark from time to time). 


During my final years in Oklahoma, the Thunder came to town. I was in a somewhat anti-NBA point by then, so I only followed them from afar. In the years since their arrival, and with some prodding from TF, I've come to embrace them (I even regularly rock a Thunder shirt in the District). 


The only downside to cheering on the Thunder from DC is that they play in the western conference with many late start times for fans on the east coast (I'm old, I need my beauty rest). Since I'm notorious for falling asleep on the couch after a certain hour, I've taken to creating projects for myself while the game is on so that I can feel productive and make it through the game without falling asleep...I'm writing this post wide awake during Game 2 :) 


On Monday night, also known as the Game 1 beatdown of LA, I stumbled upon a delicious recipe that both kept me awake and helped me get out of my lunch rut! Pinterest to the rescue once again! Sorry, as I read back through this post I'm realizing it's more sports-heavy than I intended, so for that I apologize. I also apologize if I just bored you to death with my inane ramblings about my life and basketball. Hopefully this recipe will make up for it!


Chickpea Cilantro-Lime Salad
Inspiration found here


Ingredients
  • One 15-oz can chickpeas (2 cups cooked), drained and rinsed
  • 2 cups spinach
  • Juice from 1.5 limes
  • 3/4 cup fresh Cilantro
  • 1/2 tsp sugar (or to taste)
  • 1 garlic clove
  • 1 tsp extra virgin olive oil
  • 1/2 tsp ground cumin
  • 1/2 tsp kosher salt + ground pepper
  • Tomatoes (died) *optional
  • Cucumber (chopped in food processor) *optional
Preparation

1. In a food processor, add the spinach and pulse a few times until chopped very small. Add the processed spinach and drained chickpeas into a large bowl

2. In the food processor (no need to rinse the bowl!), add the lime juice, cilantro, sugar, garlic, cumin, and oil. Process until smooth, scraping down the sides of the bowl as needed

3. Pour the dressing on top of the spinach chickpea mixture and stir well. Chop cucumber in food processor until desired chunckiness, then add to mixture. Add salt and pepper to taste. Let stand for about 10 minutes to let the flavours develop (or overnight, although the spinach gets a little soggy this way, but still good)


Enjoy and Thunder Up!


Tuesday, May 15, 2012

Marble Birthday Cupcakes

I love a good birthday. Not just my own either, everyone's....as long as I get to partake (and by partake I mean bake something for the occasion). I've found over the years that people are usually inclined to oblige my request to bake them something for their special day, so it's really a win/win. Last week, birthday time returned to my life! And, despite another busy week at work, I still made time to whip up a new recipe for Miss Allie's first DC birthday in years!

Law school was the first time I really became aware of my adultness (and birthdays spent away from home). My parents moved to the east coast the summer before I started law school and since I was born at the beginning of March, I came to rely on celebrations with friends to make my actual birthday special. 


My 24th birthday brought with it the BEST CAKE EVER--coffee infused chocolate cake courtesy of one of my favorite people, Lizzy. Coffee in cake = great excuse to eat cake for breakfast!

During my second year of law school I decided to start sharing my baking skills  in an effort to help others have a memorable birthday as well. And so, my tradition of making homemade treats for birthdays was born. Back then I was just getting into baking and thus most of my treats, while made in my home, usually came from a box. 


Since I now refuse to make anything from a box, I was thrilled when Allie requested a marble cake for her birthday treat. I'd only made a marble cake once before (during the law school baking spree....law school's awful, you really need something happy to get you through), but this time I was going it entirely from scratch!


Mable Cupcakes
Another good find from Martha

Ingredients
  • 1/2 cup (1 stick) unsalted butter, room temperature
  • 1 3/4 cups cake flour (not self-rising)
  • 2 teaspoons baking powder
  • 1/2 teaspoon salt
  • 1 cup sugar
  • 3 large eggs, room temperature
  • 1 teaspoon pure vanilla extract
  • 2/3 cup buttermilk, room temperature
  • 1/4 cup plus 1 tablespoon dark chocolate cocoa powder (Martha called for Dutch cocoa powder, but I had, and prefer, dark chocolate)

Preparation
  1. Preheat oven to 350 degrees. Line or grease cupcake tins. Whisk together the cake flour, baking powder, and salt; set aside
  2. In the bowl of an electric mixer fitted with the paddle attachment, beat the butter and sugar until light and fluffy, about 5 minutes. Add eggs, one at a time, beating until combined after each addition and scraping down the sides of the bowl as needed. Mix in vanilla. Add flour mixture in 2 batches, alternating with the buttermilk and beginning and ending with the flour. Set aside 1/3 of the batter
  3. In a bowl, mix cocoa and 1/4 cup plus 2 tablespoons boiling water with a rubber spatula until smooth. Add the cocoa mixture to the reserved cake batter; stir until well combined
  4. Spoon batters into the prepared pans, alternating spoonfuls of vanilla and chocolate to simulate a checkerboard. To create marbling, run a table knife (or wooden skewer) through the batters in a swirling motion
  5. Bake, rotating the pan halfway through, until a cake tester comes out clean, 40 to 50 minutes. Transfer pan to a rack to cool 10 minutes. Turn out cake from pan and cool completely on the rack before icing


And of course, I couldn't trust my first foray into homemade marble cake making to just any icing....


A trusted favorite surfaced yet again to complete the creation


Birthday Heaven


Monday, May 14, 2012

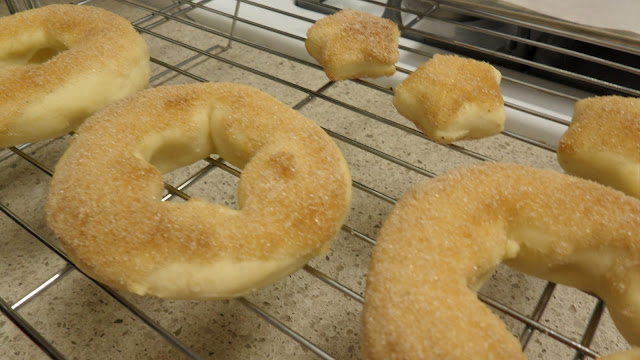
Nuts for Donuts

As I've become increasingly health conscious over the years, there are several foods that I love but rarely let myself have. One such food is donuts. I used to love a good donut. They are pretty much a symbol of all that I love in the world: bread and sugar. Donuts were always a special treat for sister and I, usually bestowed upon us when we were traveling to visit family out of state. To this day, one of my favorite parts about visiting my dad's family for Thanksgiving was the Thanksgiving morning trip to Dunken Donuts my dad would make, returning with my all time favorite donut: chocolate frosting with rainbow sprinkles.  

I've never tried to make a donut in the home, this is largely due to my fear of frying food. There's literally nothing cooking related that terrifies me more than a grease fire. So, when I got a hankering for a donut and stumbled upon a slew of recipes for baked donuts, I had no choice but to give it a go.


My first venture into donut making was a success and while this is definitely not something I'll be doing often (for health reasons), it is definitely nice to add this to my growing repertoire of food creations!

Baked Donuts
Genius behind this treat found here

Ingredients

Donuts: 

  • 1 1/3 cups warm milk, 95 to 105 degrees
  • 2 teaspoons instant yeast
  • 2 tablespoons butter
  • 2/3 cup granulated sugar
  • 2 large eggs
  • 5 cups all-purpose flour
  • A pinch or two of nutmeg, freshly grated
  • 1 teaspoon salt
Topping:
  • 1/2 cup butter, melted
  • 1 1/2 cups granulated sugar
  • 1 tablespoon cinnamon

Preparation
  1. Place the warm milk in the bowl of an electric mixer. Stir in the yeast and sugar. Add the butter. Mix the eggs, flour, nutmeg, and salt. Beat the dough with the dough hook attachment (or with a wooden spoon and eventually your hands) for 2-3 minutes at medium speed. Adjust the dough texture by adding flour a few tablespoons at a time or more milk. The dough should pull away from the sides of the bowl and be very soft and smooth but still slightly sticky – don’t overflour!
  2. Knead the dough for a few minutes (again, by mixer or by hand) and then transfer the dough to a lightly greased bowl. Cover the bowl and let the dough rise for about an hour or until it has doubled in size (the exact time will depend on the temperature of your kitchen)
  3. Punch down the dough and roll it out to about 1/2-inch thickness on a lightly floured counter. Using a doughnut cutter or a 2-3 inch circle cookie cutter, cut out circles in the dough. Carefully transfer the circles to a parchment- or silpat-lined baking sheet and stamp out the smaller inner circles using a smaller cutter. Be sure to make the holes large enough that as the donuts rise again and bake, they don’t fill in the doughnut hole with the puffiness of the dough. Cover the tray with lightly greased plastic wrap. (At this point, you can refrigerate the donuts overnight or proceed with the recipe.)
  4. Let the doughnuts rise for about another 45 minutes, until they are puffed and nearly doubled
  5. Bake in a 375 degree F oven until the bottoms are just golden, 8 to 10 minutes. Start checking the donuts around minute 8. They should still be pale on top, not golden and browned, and just barely baked through.
  6. Remove the donuts from the oven and let cool for 1-2 minutes. Dip each one in the melted butter and toss or sprinkle with the cinnamon and sugar. Serve immediately :)


Monday, May 7, 2012

Creative Comfort

Even though the month of May is just barely getting started, I am already finding myself with a slew of busy weekends ahead of me. Consequently, this was my only weekend actually staying put in the District. Usually,I like to make the most of my increasingly few free weekends by trying out some new and fun recipes, but I went into the weekend exhausted and with no desire to do anything that would require the use of my oven. Yes, on top of everything else, summer has started to rear its ugly head in the District (there is no time of year in DC that I hate more than summer...between the heat and the influx of tourists, all I want to do is hunker down in my air conditioned apartment and pray for the arrival of fall, and even better, winter). Unfortunately, any time I bake it doesn't take long for my full size oven to flood my tiny studio apartment with enough heat to make me feel like I'm cooking on the sun. While I was initially not in the mood for dealing with the influx of heat in exchange for cooking, Sunday brought with it a slight cool down in temperatures and with it, my desire to cook returned. 


During a little pinterest browsing the other day I discovered a little piece of gnocchi heaven. I'll admit, gnocchi and I haven't spent much time together over the years. I actually just discovered it a few years back during my early months in DC. Although it was love at first taste, I haven't really sought it out much in the years since, and have never made on my own. During my monthly trip to the suburbs a few weeks back, I was pillaging the local Wegmans when I stumbled upon a delightful surprise: whole wheat gnocchi. Of course, I had to get it. Unfortunately, my multiple weeks of travel resulted in me never getting to try it, until now. I'd picked up some fun cheese at Trader Joe's on my way home from work the other day and it was the perfect accompaniment to my Sunday funday meal. 


Whole Wheat Gnocchi Mac and Cheese
[Original version found here]

Ingredients
  • 1 pound purchased or homemade gnocchi
  • 2 Tbsp olive oil
  • 2 teaspoons garlic, finely chopped
  • 1 Tablespoon all-purpose flour
  • 3/4 cup fat-free milk
  • 1/4 cup shredded smoked Gouda cheese
  • 1/4 cup shredded Parmesan-Gouda reduced fat cheese
  • Salt and pepper to taste
  • 1/3 cup shredded Parmigiano-Reggiano 
  • 2 cups fresh spinach
  • 1/4 cup sun-dried tomatoes

Gnocchi cooked and topped with spinach and sun-dried tomatoes, awaiting cheese :)

Preparation
  1. Preheat oven to 375. Prepare gnocchi according to package directions. Drain and place gnocchi in a single-layer in a 1-1/2 quart shallow baking dish that has been sprayed with nonstick spray. Top with spinach and sun-dried tomatoes
  2. Heat olive oil in a medium saucepan over medium heat. Stir in garlic and cook until fragrant, about 30 seconds. Whisk in flour until it thickens and bubbles, then whisk in milk. Continue to whisk mixture and cook until slightly thickened, about 3-5 minutes
  3. Combine smoked gouda and parm-gouda, then add by the handful to milk mixture, stirring until melted before adding the next handful. Once all cheese is melted, season sauce with salt and pepper
  4. Pour sauce over gnocchi and sprinkle with Parmigiano-Reggiano over top. Bake gnocchi until they puff and the cheese is golden and bubbly, about 25 minutes. Let gnocchi rest for 5 minutes before serving

Enjoy....and prepare for a very happy stomach! 


Saturday, May 5, 2012

Comfort Breakfast Dinner

After spending the majority of the last two weeks away from DC, I was excited to get back into my normal routine this week. Unfortunately, life had other plans. Work was nothing short of treacherous this week and I found myself spending most days praying for daylight (and my freedom). The longer work days also cut into my time and desire to cook. On Wednesday, however, I was determined to make something good for dinner in an effort to cheer myself up. The one thing that always does the trick is pancakes (and wine). As you may recall, I have yet to master the art of pancake making, but I do love a good pancake puff! They're quick, easy, and rarely fail me (leaving me in a much better mood than when I attempt to cook actual pancakes). 


With a little help from my friends at google, I found a new and nutrient rich recipe to lift my spirits with. A few minutes later and I had the perfect cure all...or at least temporary spirit lifter. Yum, yum, yum. Definitely hit the spot and helped salvage my evening.


Whole Wheat Flaxseed Pancakes
Wonderful creation found here

Ingredients
  • 3/4 cup whole wheat flour
  • 1/4 cup flaxseeds, ground
  • 1 tablespoon sugar
  • 2 teaspoons baking powder
  • 1/4 teaspoon salt
  • 1 beaten egg
  • 1 cup water
  • 2 tablespoons canola oil
  • 1/2 cup fresh cut strawberries (for topping)
  • 1/2 tsp powder sugar (for topping)


Preparation
  1. Mix together dry ingredients
  2. In a different bowl, mix wet ingredients
  3. Add wet ingredients to dry ingredients and stir just until moistened
  4. Let sit for a few minutes
  5. Cook with desired method 
  6. Top with fresh strawberries and powdered sugar. Enjoy!