Pages

Showing posts with label cake. Show all posts

Monday, April 1, 2013

Springing into Easter

Despite the constantly fluctuating temperatures, Easter time has come again. One day it's winter and the next it's spring. I know I'm going to regret thinking this come July, but sometimes I wonder if it will ever be warm again. Not only is winter refusing to leave, but Easter also decided to show its face early this year?! No wonder I never know what day it is!

After I decided to accept that Easter was coming whether it was warm or not, I then had to turn my attention to more important things...deciding what new treat would I make for Easter dinner?! Similar to my friends and co-workers, my family has developed certain expectations when it comes to my cooking. Thus, while part of me wants to go bigger and better than the time before, the other part of me doesn't want to fail. Ah the conundrums that come with being a pseudo-perfectionist. Putting fears of failure aside, I turned to my beloved Pinterest for inspiration. 

It didn't take long. Nothing says spring to me like lemon. It's cool, light, and refreshing. The perfect accompaniment to a warm spring day. I'd initially planned to make these, but I spent much of Saturday soaking in a rare spring day in the District with Mother and Sister and wasn't up to a task that grand. To compromise, I used the lemon and buttercream combo as inspiration for this:

Lemon Cake with Lemon Buttercream Frosting


Ingredients

Cake [original found here]
  • 1 1/2 cups all purpose flour
  • 1 1/2 tsps baking powder
  • 1/2 tsp salt
  • 1 cup plain greek yogurt
  • 3/4 cup granulated sugar
  • 4 eggs
  • 2 tsps zest lemon zest
  • 2 Tbsps fresh lemon juice
  • 1 tsp vanilla extract
  • 1/2 cup vegetable oil
Frosting [original found here]
  • 1 cup butter, softened
  • 3 3/4 cups confectioners' sugar
  • Juice and zest of 1 lemon
  • 1 tsp vanilla extract
  • 1/8 tsp salt
  • Extra lemon for zest and slices to top finished cake if (optional)


Preparation1. Preheat the oven to 350 F degrees and prepare two 8x8 square pans for baking

2. In a small bowl, combine flour, baking powder, and salt 

3. In the bowl of a stand mixer, whisk together yogurt, sugar, eggs, lemon zest and juice, vanilla extract and vegetable oil

4. Slowly add the dry ingredients into the wet ingredients, mixing just until evenly mixed but be careful not to over-mix

5. Pour the batter into the prepared pans and bake for 28-30 minutes, or until a fork comes out clean


6. Let cake cool completely before putting together with frosting

7. To prepare frosting, combine butter, sugar, and salt and beat until well -combined

8. Add lemon juice, zest, and vanilla and beat until creamy (approx 5 mins)

9. Once cake is frosted as desired, top with some additional lemon zest and 3-4 thin lemon slices


Now if only spring would hurry up and get here...


Tuesday, May 15, 2012

Marble Birthday Cupcakes

I love a good birthday. Not just my own either, everyone's....as long as I get to partake (and by partake I mean bake something for the occasion). I've found over the years that people are usually inclined to oblige my request to bake them something for their special day, so it's really a win/win. Last week, birthday time returned to my life! And, despite another busy week at work, I still made time to whip up a new recipe for Miss Allie's first DC birthday in years!

Law school was the first time I really became aware of my adultness (and birthdays spent away from home). My parents moved to the east coast the summer before I started law school and since I was born at the beginning of March, I came to rely on celebrations with friends to make my actual birthday special. 


My 24th birthday brought with it the BEST CAKE EVER--coffee infused chocolate cake courtesy of one of my favorite people, Lizzy. Coffee in cake = great excuse to eat cake for breakfast!

During my second year of law school I decided to start sharing my baking skills  in an effort to help others have a memorable birthday as well. And so, my tradition of making homemade treats for birthdays was born. Back then I was just getting into baking and thus most of my treats, while made in my home, usually came from a box. 


Since I now refuse to make anything from a box, I was thrilled when Allie requested a marble cake for her birthday treat. I'd only made a marble cake once before (during the law school baking spree....law school's awful, you really need something happy to get you through), but this time I was going it entirely from scratch!


Mable Cupcakes
Another good find from Martha

Ingredients
  • 1/2 cup (1 stick) unsalted butter, room temperature
  • 1 3/4 cups cake flour (not self-rising)
  • 2 teaspoons baking powder
  • 1/2 teaspoon salt
  • 1 cup sugar
  • 3 large eggs, room temperature
  • 1 teaspoon pure vanilla extract
  • 2/3 cup buttermilk, room temperature
  • 1/4 cup plus 1 tablespoon dark chocolate cocoa powder (Martha called for Dutch cocoa powder, but I had, and prefer, dark chocolate)

Preparation
  1. Preheat oven to 350 degrees. Line or grease cupcake tins. Whisk together the cake flour, baking powder, and salt; set aside
  2. In the bowl of an electric mixer fitted with the paddle attachment, beat the butter and sugar until light and fluffy, about 5 minutes. Add eggs, one at a time, beating until combined after each addition and scraping down the sides of the bowl as needed. Mix in vanilla. Add flour mixture in 2 batches, alternating with the buttermilk and beginning and ending with the flour. Set aside 1/3 of the batter
  3. In a bowl, mix cocoa and 1/4 cup plus 2 tablespoons boiling water with a rubber spatula until smooth. Add the cocoa mixture to the reserved cake batter; stir until well combined
  4. Spoon batters into the prepared pans, alternating spoonfuls of vanilla and chocolate to simulate a checkerboard. To create marbling, run a table knife (or wooden skewer) through the batters in a swirling motion
  5. Bake, rotating the pan halfway through, until a cake tester comes out clean, 40 to 50 minutes. Transfer pan to a rack to cool 10 minutes. Turn out cake from pan and cool completely on the rack before icing


And of course, I couldn't trust my first foray into homemade marble cake making to just any icing....


A trusted favorite surfaced yet again to complete the creation


Birthday Heaven


Tuesday, April 10, 2012

Death by Chocolate


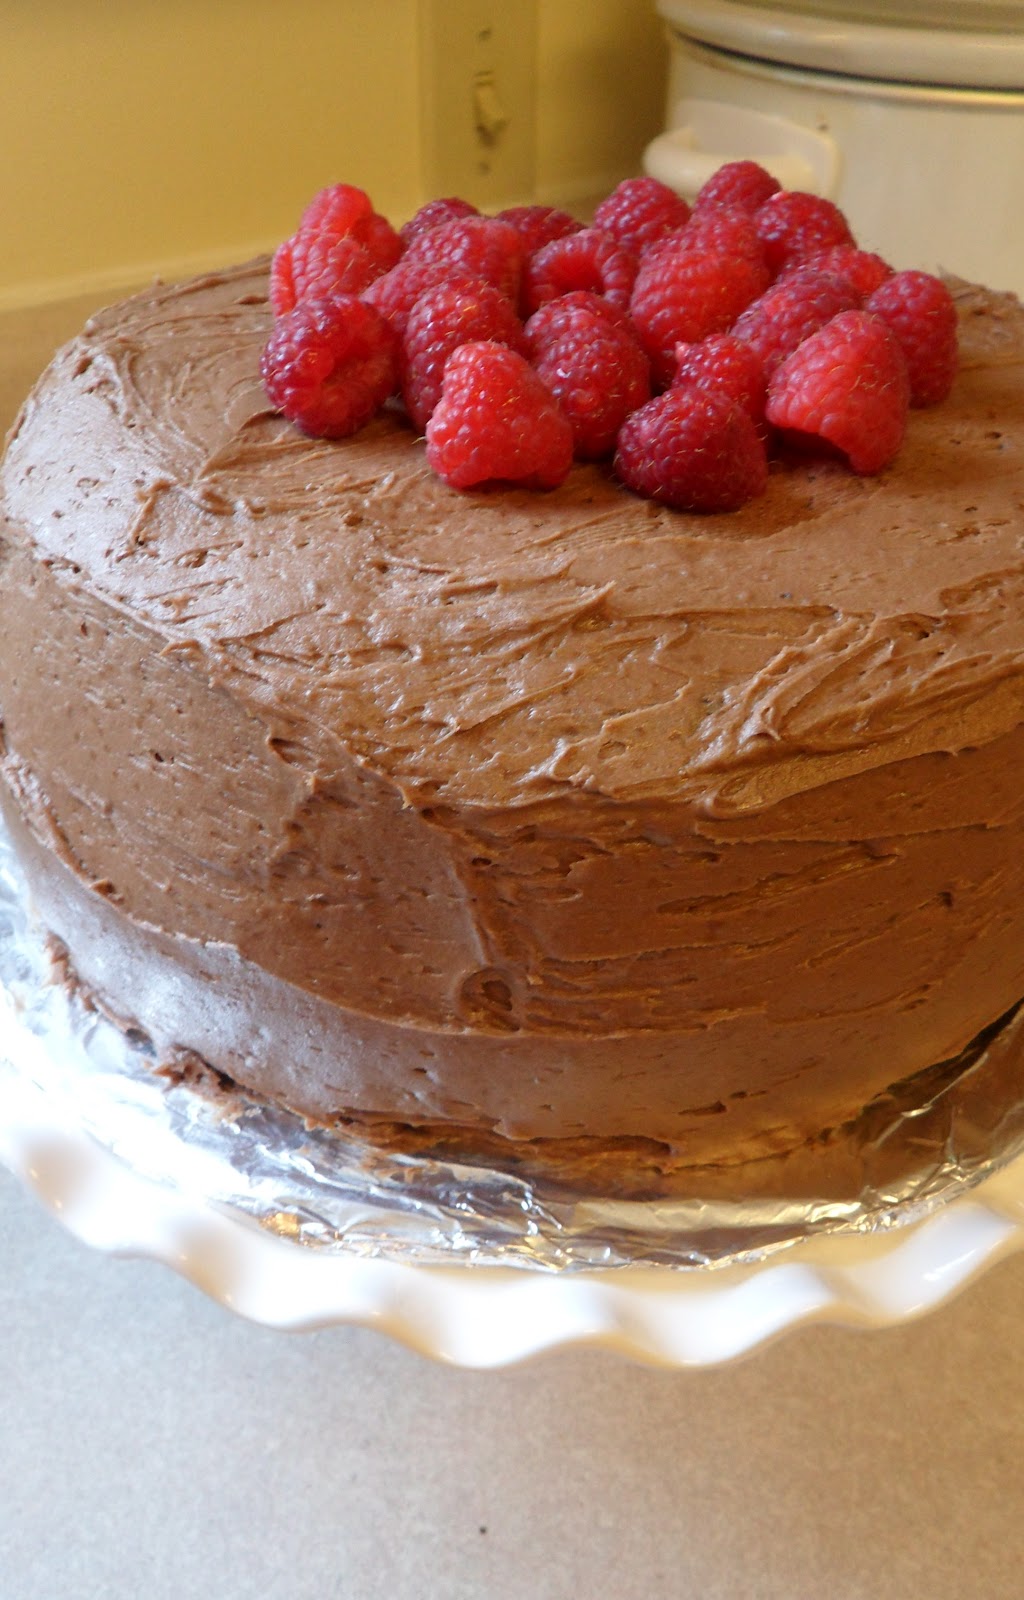
When I started to think about the order in which I wanted to share my recipes from last weekend, I fully intended to share this one last, as a grand finale of sorts. Unfortunately, when I was pulling pictures for yesterday’s post, my excitement got the better of me and I decided I had to share this creation sooner rather than later!

Up until this point, nothing that I’ve cooked up has elicited the level of pride in me that this cake did. I attribute that to two things: challenge level and the addition of a new cooking accessory, my first cake stand. Obtaining a cake stand hasn't been a long standing dream of mine (I don't really make that many cakes, let alone have cause to display them proudly), but after obtaining Mr. Red, it seemed like the next logical step. So, when mother and I were out running errands on Saturday (as per our custom when I'm in town) a cake stand caught my eye. It was plain and simple and not what I envisioned my first cake stand looking like, but it ignited in me a desire to finally obtain one. Despite the fact that we were relatively pressed for time and I continued to take on various pre-Easter projects,  Mother encouraged my quest with trepedation. I talked her into stopping at Bed Bath and Beyond and Michael's, but both failed me. Not really having the energy to pursue the search beyond what was convenient, I resigned myself to internet shopping upon returning to the District. And then Pier 1 appeared. 


I've loved that store since I was little and we'd go there to buy replacement cushions for our papashian chair (who's name I was certain my parents had made up). Mother and I love that store and it's one of those places we could easily spend an hour or more wandering around. Since we were on somewhat of a time crunch, we had to hurry a little, but not so much that an ounce of the store was left uncovered :) About midway through, I found it....a cake stand worthy of the title of first cake stand! Joy filled me as I proudly marched it to the counter for purchasing (I'm fairly certain the sales lady thought I was crazy...or on some sort of drug-induced high). With the purchase of my cake stand, I knew this cake had to be epic. And it was, earning it the title of "first adult cake."


As part of my Thanksgiving dessert ensemble (it's my favorite holiday and I went big last year, making three delicious treats), Alicia was kind enough to pass along the best chocolate cake recipe ever from her sister. It was actually the first chocolate cake I ever made from scratch and it pretty much sold me on never making a boxed cake again! Not wanting to make the entirely same cake again, I decided I'd use it as the base and add a chocolate mouse filling, chocolate ganache topping and fresh raspberries (as seen on one of my favorite blogs). 


Well, chocolate mouse was a fail. It was my first pass at it and it ended with a bowl of chocolate goo. I was disappointed but not heartbroken (I don't actually care for mouse). I blame it on the fact that Mr. Red didn't make the trip to Bmore with me and thus I didn't have my trusty whisk attachment. I will conquer mouse eventually, but that's for another post. This time, I improvised, and the result was deathly delicious!


Alicia's Chocolate Cake


Ingredients
  • 2 cups sugar
  • 1 3/4 cups all purpose flour
  • 3/4 cup cocoa powder
  • 1 1/2 tsp baking powder
  • 1 1/2 tsp baking soda
  • 1 tsp salt
  • 2 eggs
  • 1 cup milk
  • 1/2 cup vegetable oil
  • 2 tsp vanilla
  • 1 cup boiling water
Preparation
  1. Preheat oven to 350F and grease/flour desired pan size (recipe makes 2 9 inch rounds)
  2. Combine dry ingredients in large bowl
  3. Add milk, eggs, oil, and vanilla, beat on medium speed for 2 minutes
  4. Stir in boiling water (batter will become thin)
  5. Distribute batter evenly among pans. Bake for 30-35 minutes


Chocolate Ganache
[original found here...along with my inspiration for this cake]


Ingredients
  • 1/2 cup + 1 Tbsp sugar
  • 1/2 cup unsweetened cocoa powder
  • 1/2 cup heavy whipping cream
  • 1/2 tsp vanilla
  • 3 ounces finely chopped chocolate
Preparation
  1. In a small heavy saucepan, combine sugar and cocoa powder
  2. Gradually add just enough milk to make a paste, then stir in the rest
  3. Cook over medium heat, stirring constantly with a spatula (make sure you’re getting the corners of the pan) until mixture comes to a boil. Boil gently, and stir for about 2 minutes
  4. Remove from heat and add vanilla
  5. Let cool for 5 minutes. Stir in chocolate until melted and smooth
  6. Cover the surface of the frosting with wax paper and let cool until spreadable
Since my attempt at the mouse filing was a fail, I ended up using the ganache as my filling. It's very rich, so it worked perfectly in small doses. To offset the richness of the ganache, I used a light chocolate buttercream frosting to top things off. Worked like a charm.


Chocolate Buttercream Frosting
[Original found here]

Ingredients
  • 1 cup unsalted butter (2 sticks or 1/2 pound), softened (but not melted!)
  • 3 1/2 cups confectioners (powdered) sugar
  • 1/2 cup cocoa powder
  • 1/2 teaspoon table salt
  • 2 teaspoons vanilla extract or 1 teaspoon almond extract
  • 4 tablespoons milk or heavy cream
  • Fresh raspberries for topping
Preparation

  1. Cream butter for a few minutes in a mixer with the paddle attachment on medium speed
  2. Sift 3 cups powdered sugar and cocoa into the mixing bowl. Turn your mixer on the lowest speed (so the dry ingredients do not blow everywhere) until the sugar and cocoa are absorbed by the butter
  3. Increase mixer speed to medium and add vanilla extract, salt, and milk/cream and beat for 3 minutes
  4. If your frosting needs a more stiff consistency, add a little more sugar. If your frosting needs to be thinned out, add additional milk 1 tablespoon at a time


Sweet.

Chocolate.

Love.


Wednesday, February 22, 2012

Pineapple Upside Down Cake for Sister

It occurred to me this evening that I'd failed to complete my V-Day week love fest of posts/recipes. To be honest, the last couple of days have not been the best and I considered taking a break from blogging for a bit as I want this blog to remain a happy place. But after giving it some thought, I decided that I should focus on happier times to distract myself and thus, here I am, sharing the next of my Valentine's week inspired recipes.

As I was preparing to enter my fourth year of life, my parents informed me that I was going to be getting a sister. I don't really remember how I handled the news, but the life-size cookie monster that I received as a consolation prize certainly didn't hurt matters. Their words didn't really resonate with me until sister arrived and I was not amused (cut to many pictures of me with my vertical brow on and perched next to sister's carrier). As time passed, I grew accustomed to her face and as she became more mobile and coherent, I began to enjoy having a playmate. In recent years, sister and I have gotten much closer and I am continuously surprised by how wise beyond her years she has become (I'm certain no thanks to me trying to off her for so many years).

5 years ago this fall, my parents moved back to the east coast (my mother's native land) and since their return, August has become birthday month for our family. My grandmom, dad, and sister all have birthdays within two weeks of each other and it's quickly become a family tradition to merge our yearly crab feast with a triple birthday party. Even though it's not my birthday, I continue to find myself equally as excited for the event to take place. Although they're forced to partake in a triple celebration, they all still get their own cake. My dad loves pound cake more than anything, so I've always assumed the role of making his. I've made my grandmom her's a time or two, but not as a rule, and she usually does sister's cake. 

Sister loves a good pineapple upside down cake. I have never really cared for the creation, but when my grandmom announced that she was no longer into undertaking the task (to be fair, she is pushing 87), I decided to take the reins. Living up to the high cooking standards that my grandmother has set over the years is terrifying to say the least. Couple that with having to make something that I've never attempted before and I was beyond nervous about the end result. Thankfully, the cake gods decided to let me have this victory and I was able to present sister with my masterpiece (to which she was both thrilled and surprised).

Sister's 22nd Birthday

Grandmom's Pineapple Upside Down Cake

Ingredients
  • 1/4 c of butter or margarine
  • 1 c of packed brown sugar
  • 1 can of sliced pineapples (drained, but save the juice)
  • 1 jar of maraschino cherries (these creep me out, so I used fresh cherries and just seeded/halved them)
  • 1 box of yellow cake mix (when I make this again this year I will be doing this part from scratch as well)

Preparation

  1. Melt butter in 13x9 cake pan 
  2. Dump the brown sugar and stir until smooth into the butter
  3. Lay pineapples on top of the brown sugar mixture
  4. Mix cake mix according to directions on the box, BUT use saved pineapple juice instead of water
  5. Pour cake mix over pineapples
  6. Bake on 350 for 40-45 minutes or until a toothpick comes out clean
  7. Allow cake to cool (overnight is best). Flip pan over and try to lift it off the cake. The bottom part from the pan is now the top of the cake.
  8. Put cherries into the pineapple holes--enjoy :)

My Maryland summers will never be complete without crabs

 Ready to get our feast on

Remains...we don't mess